标签 ESP8266 下的文章

终于可以不再拼接字符串,而可以直接使用文件系统。

安装FS上传插件

在如下地址下载:

https://github.com/esp8266/arduino-esp8266fs-plugin/releases

将获得的压缩包解压,将ESP8266FS文件夹复制到你的Arduino安装目录的tools文件夹里,重启IDE。
注意:它好像挑版本,我使用1.6.7会报错,使用1.8.5正常上传。

一些说明

1.如何选择我的SPIFFS大小

  • 在你的IDE菜单中(工具 > Falsh Size > 4M(1M SPIFFS)),视情况选择大小。(Falsh)一般ESP01为1M大小,ESP12为4M大小。

2.是否有文件限制

  • 传,都可以传(只要有空间),点击工具菜单中ESP8266 SKetch Data Upload来上传data中的文件。

3.FS库的文档

使用

在你的项目路径会自动生成(如果没有请手动新建)data文件夹,里面存放你要上传的文件,比方说html,css之类的。
我们放入一个index.html,来试一试:

#include <ESP8266WiFi.h>
#include <WiFiClient.h>
#include <ESP8266WebServer.h>
#include "FS.h"
const char* ssid = "SSID";
const char* password = "PASSWORD";
ESP8266WebServer server(80);
void Route_Index() {
  if(SPIFFS.exists("/index.html")){ //文件存在检测
    File f = SPIFFS.open("/index.html", "r");
    if(!f){ //异常处理
      server.send(500,"text/html","Error on opening!");
    }else{
      String data = f.readString();
      f.close();
      server.send(200,"text/html",data);
    }
  }else{
   server.send(404,"text/html","Not found!");
  }
}
void setup(void){
  Serial.begin(115200);
  WiFi.begin(ssid, password);
  while (WiFi.status() != WL_CONNECTED) {
    delay(500);
    Serial.print(".");
  }
  Serial.println("IP: ");
  Serial.print(WiFi.localIP());
  server.on("/",Route_Index);
  server.begin();
  if(!SPIFFS.begin()){ //初始化
    Serial.println("File system init failed!");
  }
}

搞得这个MicroPython啊,亦可赛艇。
经过上一篇文章,已经配置好了WiFi连接和Webrepl,下面我们来尝试与ESP8266来通信,在GPIO2上我接入了一个DS18x20温度传感器,通过访问ESP8266的8267端口,来获得ESP8266上传感器的数值。

main.py:
(在ESP8266上的socket库叫usocket,json库叫ujson)

 from ds18020 import DS18020
 import usocket
 import ujson
 import esp
 host = '0.0.0.0'
 port = 8267

 ds = DS18020(2)
 ds_addr = ds.getaddr()

 s = usocket.socket()
 s.bind((host,port))
 s.listen(6)
 while True:
     client,addr = s.accept()
     print('Client IP:',addr[0])
     info = {}
     info['flash_size'] = str(esp.flash_size())
     info['flash_free'] = str(esp.freemem())
     info['flash_id'] = str(esp.flash_id())
     info['ds18x20_temp'] = str(ds.gettemp(ds_addr[0]))
     print(info)
     client.send(ujson.dumps(info))
     info = {}
     client.close()

ds18020.py
(很惭愧,只做了一点的微小工作)

 import onewire
 import ds18x20
 import time
 from machine import Pin
 class DS18020:
     def __init__(self,pin):
         self.pin = Pin(pin)
     def getaddr(self):
         ow = onewire.OneWire(self.pin)
         self.ds = ds18x20.DS18X20(ow)
         roms = self.ds.scan()
         return roms
     def gettemp(self,addr):
         self.ds.convert_temp()
         time.sleep_ms(450)
         return self.ds.read_temp(addr)

效果:
31_0.PNG
今天还是挺冷的。

之前一直用Arduino,现在来尝试一下Python。

烧录

1. 到官网下载固件

http://www.micropython.org/download

2. 安装esptool工具

请确保有Python环境(Linux或Windows)

pip install esptool

3. 清空Flash

这一步很重要,可以避免很多错误:

esptool.py --port /dev/ttyUSB0 erase_flash (Windows下port为COM口)

4. 下载到ESP8266上

下载前先将GPIO0下拉,进入下载模式:

esptool.py --port /dev/ttyUSB0 --baud 460800 write_flash --flash_size=detect 0 esp8266-20180511-v1.9.4.bin

有些模块的Flash是512K的,可能无法下载固件,可以通过esptool来查看:

esptool.py --port /dev/ttyUSB0 flash_id

连接WiFi与远程编程

通过串口连接ESP8266,可以看到串口输出:
25_0.PNG
依次输入:

>>> import network
>>> sta_if = network.WLAN(network.STA_IF)
>>> sta_if.active(True)
>>> sta_if.connect("", "") #SSID,PASSWD
>>> sta_if.isconnected()
>>> print("IP:",sta_if.ifconfig()[0])

连接后可以看到模块的IP。
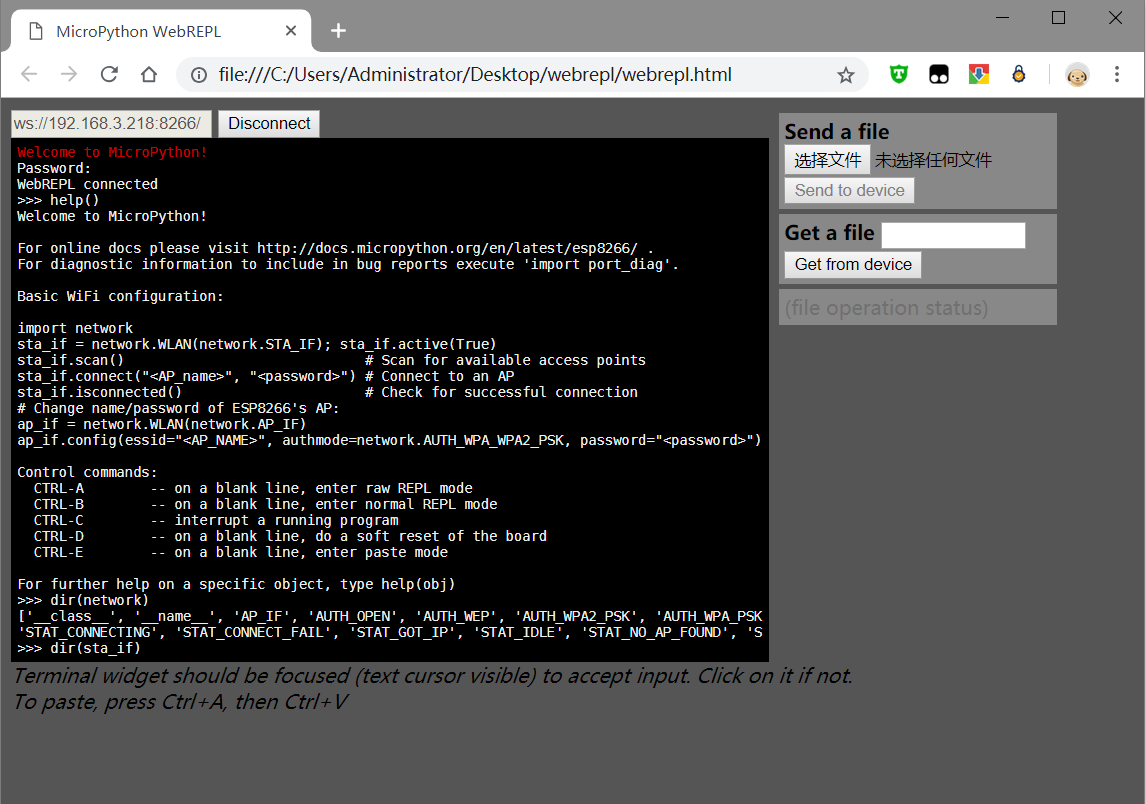
远程编程需要用到webrepl,你可以使用MicroPython的在线客户端,或从Github获取:

  1. Github:https://github.com/micropython/webrepl
  2. 在线客户端:http://micropython.org/webrepl

在使用webrepl前,需要进行配置,在串口输入:

>>> import webrepl_setup #按提示配置

配置完成后再在串口输入下面的代码,来开启:

>>> import webrepl
>>> webrepl.start()

你可以通过webrepl来上传/下载文件。
webrepl的界面:
25_1.PNG

文件系统

输入下面命令查看当前有的文件:

 >>> os.listdir()
 ['boot.py', 'webrepl_cfg.py', 'main.py']
 boot.py main.py前被执行(开发板启动时将执行这个该脚本,它设置了开发板的多个选项参数) | main.py 主程序

查看剩余空间:

>>> import micropython
>>> micropython.mem_info()
stack: 2112 out of 8192
GC: total: 35968, used: 10000, free: 25968
No. of 1-blocks: 44, 2-blocks: 15, max blk sz: 264, max free sz: 1417

文档

http://docs.micropython.org/en/latest/library/index.html#python-standard-libraries-and-micro-libraries

还是非常简单的,通过网页控制ESP8266,直接访问ESP8266的IP就行了。

代码:

//请先部署 ESP8266 for Arduino 环境
//随便注释了一下
#include <ESP8266WiFi.h>
#include <ESP8266WebServer.h>
const char* ssid = "WIFINAME";
const char* pass = "PASSWORD";
ESP8266WebServer server(80);//端口
int pin = 2;
String gethtml(){//Html
    String h; //= "HTTP/1.1 200 OK\r\n";
    h += "<meta http-equiv=\"Content-Type\" content=\"text/html; charset=utf-8\" />";
    h += "<style type=\"text/css\"> body{text-align: center;} </style>";
    h += "<!DOCTYPE HTML>";
    h += "<html>";
    h += "<p>ESP8266</p>";
    h += "<p>当前状态:";
    if(digitalRead(pin) == 1){
        h += "关";
    }else{
        h += "开";
    }
    h += "</p>";
    h += "<a href=\"on\"><button>on</button></a>";
    h += "<p>&nbsp;</p>";
    h += "<a href=\"off\"><button>off</button></a>";
    h += "<p>Powered by chutian.bid  (低电平触发)</p>";
    h += "</html>";
    return h;
}
void onl(){
    digitalWrite(pin,LOW);
    Serial.println("on 0");
    server.send(200, "text/html",gethtml());
}
void offl(){
    digitalWrite(pin,HIGH);
    Serial.println("off 1");
    server.send(200, "text/html",gethtml());
}
void htmlout(){
    server.send(200, "text/html",gethtml());
}
void readl(){
    char* h;
    if(digitalRead(pin) == 1){
        h = "off";
    }else{
        h = "on";
    }
    server.send(200, "text/html",h);
}
void setup() {
    Serial.begin(9600);
    Serial.println();
    Serial.println("ESP8266");
    pinMode(pin,OUTPUT);
    digitalWrite(pin, 1);//低电触发
    WiFi.begin(ssid,pass);//连接WiFi
    while(WiFi.status() != WL_CONNECTED){//连接判断
        delay(300);
        Serial.print(".");
    }
    Serial.println();
    Serial.println(WiFi.localIP());//取IP
    server.on("/on",onl);
    server.on("/off",offl);
    server.on("/read",readl);
    server.onNotFound(htmlout);
    server.begin();//开始
}
void loop() {
    server.handleClient();//循环
}