写这个是为了下载纪录片用的。

比如这个页面:舌尖上的中国第二季

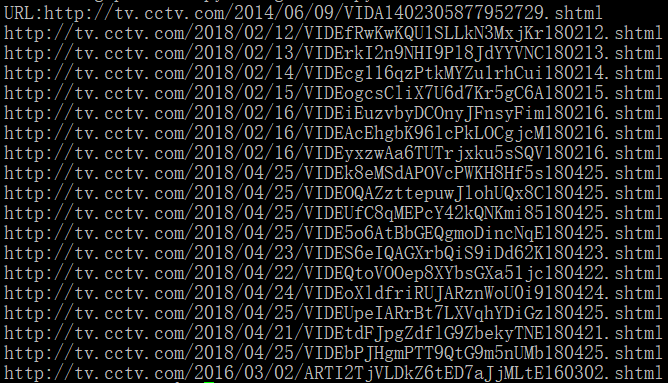
它会抓取这个页面的所有视频链接并输出到txt文件。

#!/usr/bin/env python
# -*- coding: UTF-8 -*-
import requests,re,os
#取网页内容
def gethtml(url):
    data = requests.get(url)
    return data.text
#正则匹配部分
def reurlstart(url):
    #os.remove('getcntv.txt')
    info = []
    text = gethtml(url)
    #央视的视频链接一般为 http://tv.cctv.com/年/月/日/乱七八糟.shtml
    #正则匹配式:[a-zA-z]+://tv.cctv.com/[0-9]*/[0-9]*/[0-9]*/.*"
    data = re.findall(r'[a-zA-z]+://tv.cctv.com/[0-9]*/[0-9]*/[0-9]*/.*"',text,re.I)
    for i in data:
        i = i.split('"')
            if i[0] != url:
                #这里要进行一次分割,因为原链接是 视频链接 + " + html
                info.append(i[0])
    #得到的数组有重复的链接,所以要去重
        dellist(info)
#去除重复链接
def dellist(list):
    list2 = []
    for i in list:
        if i not in list2:
            print i
            wfile(i)
                list2.append(i)
    return list2
#写文件
def wfile(text):
    f = open('getcntv.txt','a+')
    f.write(text + '\n')
    f.close()

a = raw_input('URL:')
reurlstart(a)
374_0.png

1.安装pyOpenSSL库

pip install pyOpenSSL
(仅pip)

2.修改原有代码

端口改为443,在原有参数上加上ssl_context=('证书路径','私钥路径')即可

app.run(host='0.0.0.0',port=443,ssl_context=('/root/certificate.crt', '/root/private.key'))

1.插上网卡,输入 lsusb

340_1.png

*1-1.更新软件包

apt-get update && apt-get upgrade && apt-get autoremove

2.安装依赖包

apt-get -y install linux-headers-sun8i build-essential fakeroot dpkg-dev

3.下载驱动源码

wget http://cdn-cw.mediatek.com/Downloads/linux/DPO_MT7601U_LinuxSTA_3.0.0.4_20130913.tar.bz2

4.解压

tar -jxvf DPO_MT7601U_LinuxSTA_3.0.0.4_20130913.tar.bz2
cd DPO_MT7601U_LinuxSTA_3.0.0.4_20130913

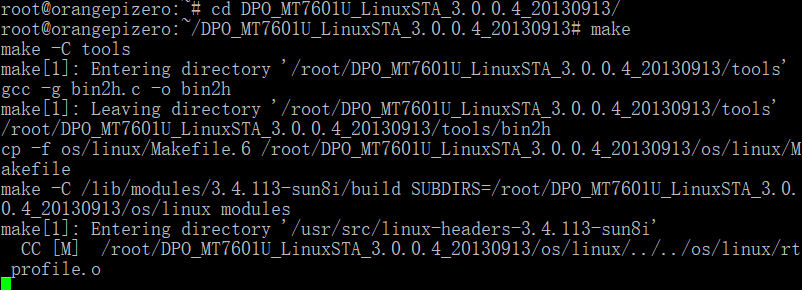
5.进了目录直接make

make
make install

340_2.png

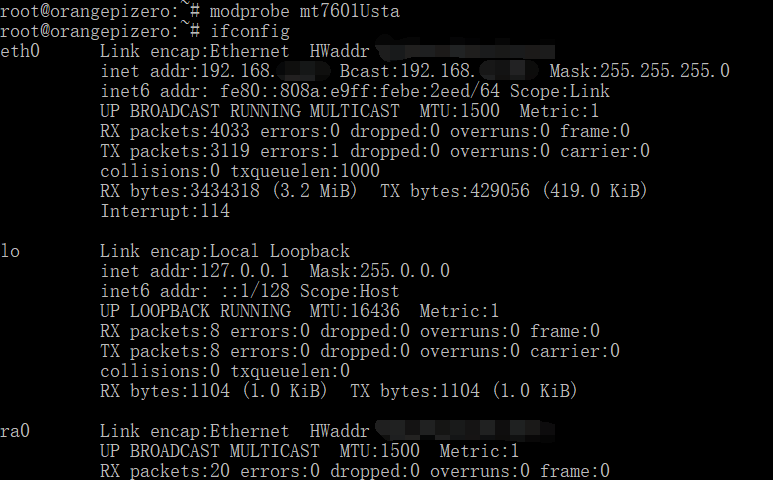
6.加载驱动

modprobe mt7601Usta

现在可以ifconfig看看了,多出来个ra0,后面按正常连接配置就行了。

340_3.png

MT7601u发热感人,Orange Pi自带XR819就是垃圾。

yeelink经常登不上,然后各种500,所以换个平台:乐为物联。

#!/usr/bin/env python
# -*- coding: UTF-8 -*-
import requests
import os
import time
import random
apikey = 'youapikey'
#id=网关名 name=设备标识 value=数据
def updata(id,name,value):
    url = "http://www.lewei50.com/api/V1/gateway/UpdateSensors/"+ id
    head = {'userkey': apikey}
    #, 'content-type': 'application/json'}
    date = '[ {"Name":"'+ name  #超级睿智的拼json数据,老早以前写的。
    date = date + '","Value":'+ str(value) +' }]'
    d = requests.post(url,headers=head,data=date)
    return d.text
def getRAMinfo():
    p = os.popen('free')
    i = 0
    while 1:
        i = i + 1
        line = p.readline()
        if i==2:
            return(line.split()[1:4])#对 free 命令返回的结果进行解析,分割。
def ram():
    RAM_stats = getRAMinfo()
    RAM_free = round(int(RAM_stats[2]) / 1000,1)
    return str(RAM_free)
if __name__ == '__main__':
    sj = ram()
    updata('web','free',sj)
    time.sleep(11) #平台接口限制10秒传一次

非常非常简单的写了一下,没有错误判断,就Post提交一下。

图灵机器人:http://www.tuling123.com/

Api文档:https://www.kancloud.cn/turing/web_api/522992

#coding=utf-8
import requests,json,sys
print '213小助手 v1.0'
apikey = 'Your Api Key'
def getsay(say):
    url = "http://openapi.tuling123.com/openapi/api/v2"
    date = '{"reqType":0,"perception": {"inputText": {"text": "'+ say
    date = date + '"},"selfInfo": {"location": {"city": "Your City",}}},"userInf$
    d = requests.post(url,data=date) #拼json数据,然后提交
    return d.text
def printout(say):
    say = json.loads(say)
    return info['results'][0]['values']['text'] #取机器人返回的信息,关于返回的内容可以看Api文档,这里只是简单的取一下text
while(1):
    com = raw_input('说:')
    if(com == '退出'):
        sys.exit(0) #退出
    else:
        print '213答:',
        print printout(getsay(com))

Flask 是 Python 的一款轻量化Web框架,使用Flask可以快速完成Web应用的开发。

1 安装

Pip 方式:

pip install flask

Apt方式:

sudo apt-get install python-flask

在pip安装不了时使用apt强制安装

2 一个最小的应用

from flask import Flask #引用
app = Flask(__name__)

@app.route('/') #路由
def hello_world():
    return 'Hello World!' #返回

if __name__ == '__main__':
    app.run(host='0.0.0.0',port=80) #全IP访问,80端口

使用Armbian系统可以很方便的使用h3disp来设置。

root@orangepione:~# h3disp -m
    480i        use "-m 480i" or "-m 0"
    576i        use "-m 576i" or "-m 1"
    480p        use "-m 480p" or "-m 2"
    576p        use "-m 576p" or "-m 3"
    720p50      use "-m 720p50" or "-m 4"
    720p60      use "-m 720p60" or "-m 5"
    1080i50     use "-m 1080i50" or "-m 6"
    1080i60     use "-m 1080i60" or "-m 7"
    1080p24     use "-m 1080p24" or "-m 8"
    1080p50     use "-m 1080p50" or "-m 9"
    1080p60     use "-m 1080p60" or "-m 10"
    1080p25     use "-m 1080p25" or "-m 11"
    1080p30     use "-m 1080p30" or "-m 12"
    1080p24_3d  use "-m 1080p24_3d" or "-m 13"
    720p50_3d   use "-m 720p50_3d" or "-m 14"
    720p60_3d   use "-m 720p60_3d" or "-m 15"
    1080p24_3d  use "-m 1080p24_3d" or "-m 23"
    720p50_3d   use "-m 720p50_3d" or "-m 24"
    720p60_3d   use "-m 720p60_3d" or "-m 25"
    1080p25     use "-m 1080p25" or "-m 26"
    1080p30     use "-m 1080p30" or "-m 27"
    4kp30       use "-m 4kp30" or "-m 28"
    4kp25       use "-m 4kp25" or "-m 29"
    800x480     use "-m 800x480" or "-m 31"
    1024x768    use "-m 1024x768" or "-m 32"
    1280x1024   use "-m 1280x1024" or "-m 33"
    1360x768    use "-m 1360x768" or "-m 34"
    1440x900    use "-m 1440x900" or "-m 35"
    1680x1050   use "-m 1680x1050" or "-m 36"
    2048x1536   use "-m 2048x1536" or "-m 37"

 Two examples:
    'h3disp -m 1080p60 -d' (1920x1080@60Hz DVI)
    'h3disp -m 720i' (1280x720@30Hz HDMI)

1.安装PyGame(Apt方式):

sudo apt-get install python-pygame

2.安装PyGame(Pip方式):

pip install pygame

3.代码

import pygame
import pygame.camera
from pygame.locals import *  #引用

pygame.init()
pygame.camera.init()  #初始化

camera = pygame.camera.Camera("/dev/video0", (1280, 720))  #指定设备,设置宽度高度
camera.start()
image = camera.get_image()  #Get
pygame.image.save(image, "image.jpg")  #保存
camera.stop()