2020年7月

缘由

在上一篇文章中,我使用了Python来控制我的键盘,但我的OBS好像有时有反应,有时没反应,所以从抽屉中找到了5年前买的Digispark ,用它来做一个硬键盘。
不得不说幸好当初买了两块,有一块被我改错熔丝锁住了。

Arduino环境部署

文件>首选项>附加开发板管理器网址添加如下:

http://digistump.com/package_digistump_index.json

工具>开发板>开发板管理器中找到Digispark后安装即可。

原理图

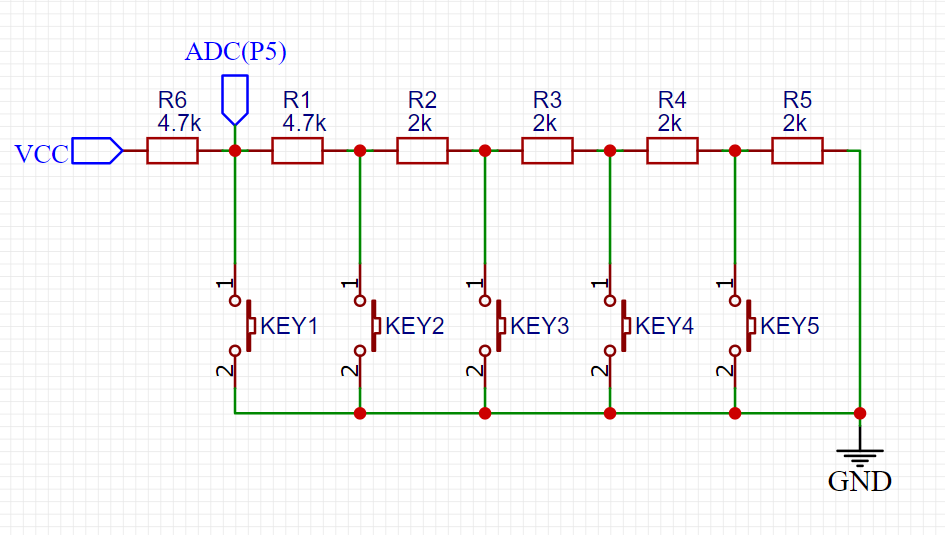
  • 由于Digispark只有6个IO,且有2个IO用作USB通信,所以最后只剩下4个可用IO(如果你没有改过熔丝位,那就是3个,P5不可用)。
  • 为了塞下5个按钮,使用了ADC(P5/A0)来检测按键按下。
  • 该板P1接板载红色LED。

IMG114153.png

从KEY1到KEY5的ADC值为(VCC=5v):0|509|520|530|540。

代码

#include "DigiKeyboard.h"

void setup() {
  pinMode(1,OUTPUT);
}

//void button(int key_a,int key_b){}
void loop() {
  int AnalogValue = analogRead(A0);
  if(AnalogValue == 0){
    digitalWrite(1,HIGH);
    DigiKeyboard.sendKeyStroke(KEY_F1,MOD_CONTROL_RIGHT);
    delay(200);
  }
  if(508 <= AnalogValue && AnalogValue <= 512){
    digitalWrite(1,HIGH);
    DigiKeyboard.sendKeyStroke(KEY_F2,MOD_CONTROL_RIGHT);
    delay(200);
  }
  if(518 <= AnalogValue && AnalogValue <= 522){
    digitalWrite(1,HIGH);
    DigiKeyboard.sendKeyStroke(KEY_F3,MOD_CONTROL_RIGHT);
    delay(200);
  }
  if(528 <= AnalogValue && AnalogValue <= 532){
    digitalWrite(1,HIGH);
    DigiKeyboard.sendKeyStroke(KEY_F4,MOD_CONTROL_RIGHT);
    delay(200);
  }
  if(538 <= AnalogValue && AnalogValue <= 542){
    digitalWrite(1,HIGH);
    DigiKeyboard.sendKeyStroke(KEY_F5,MOD_CONTROL_RIGHT);
    delay(200);
  }
  digitalWrite(1,LOW);
  DigiKeyboard.delay(200);
}

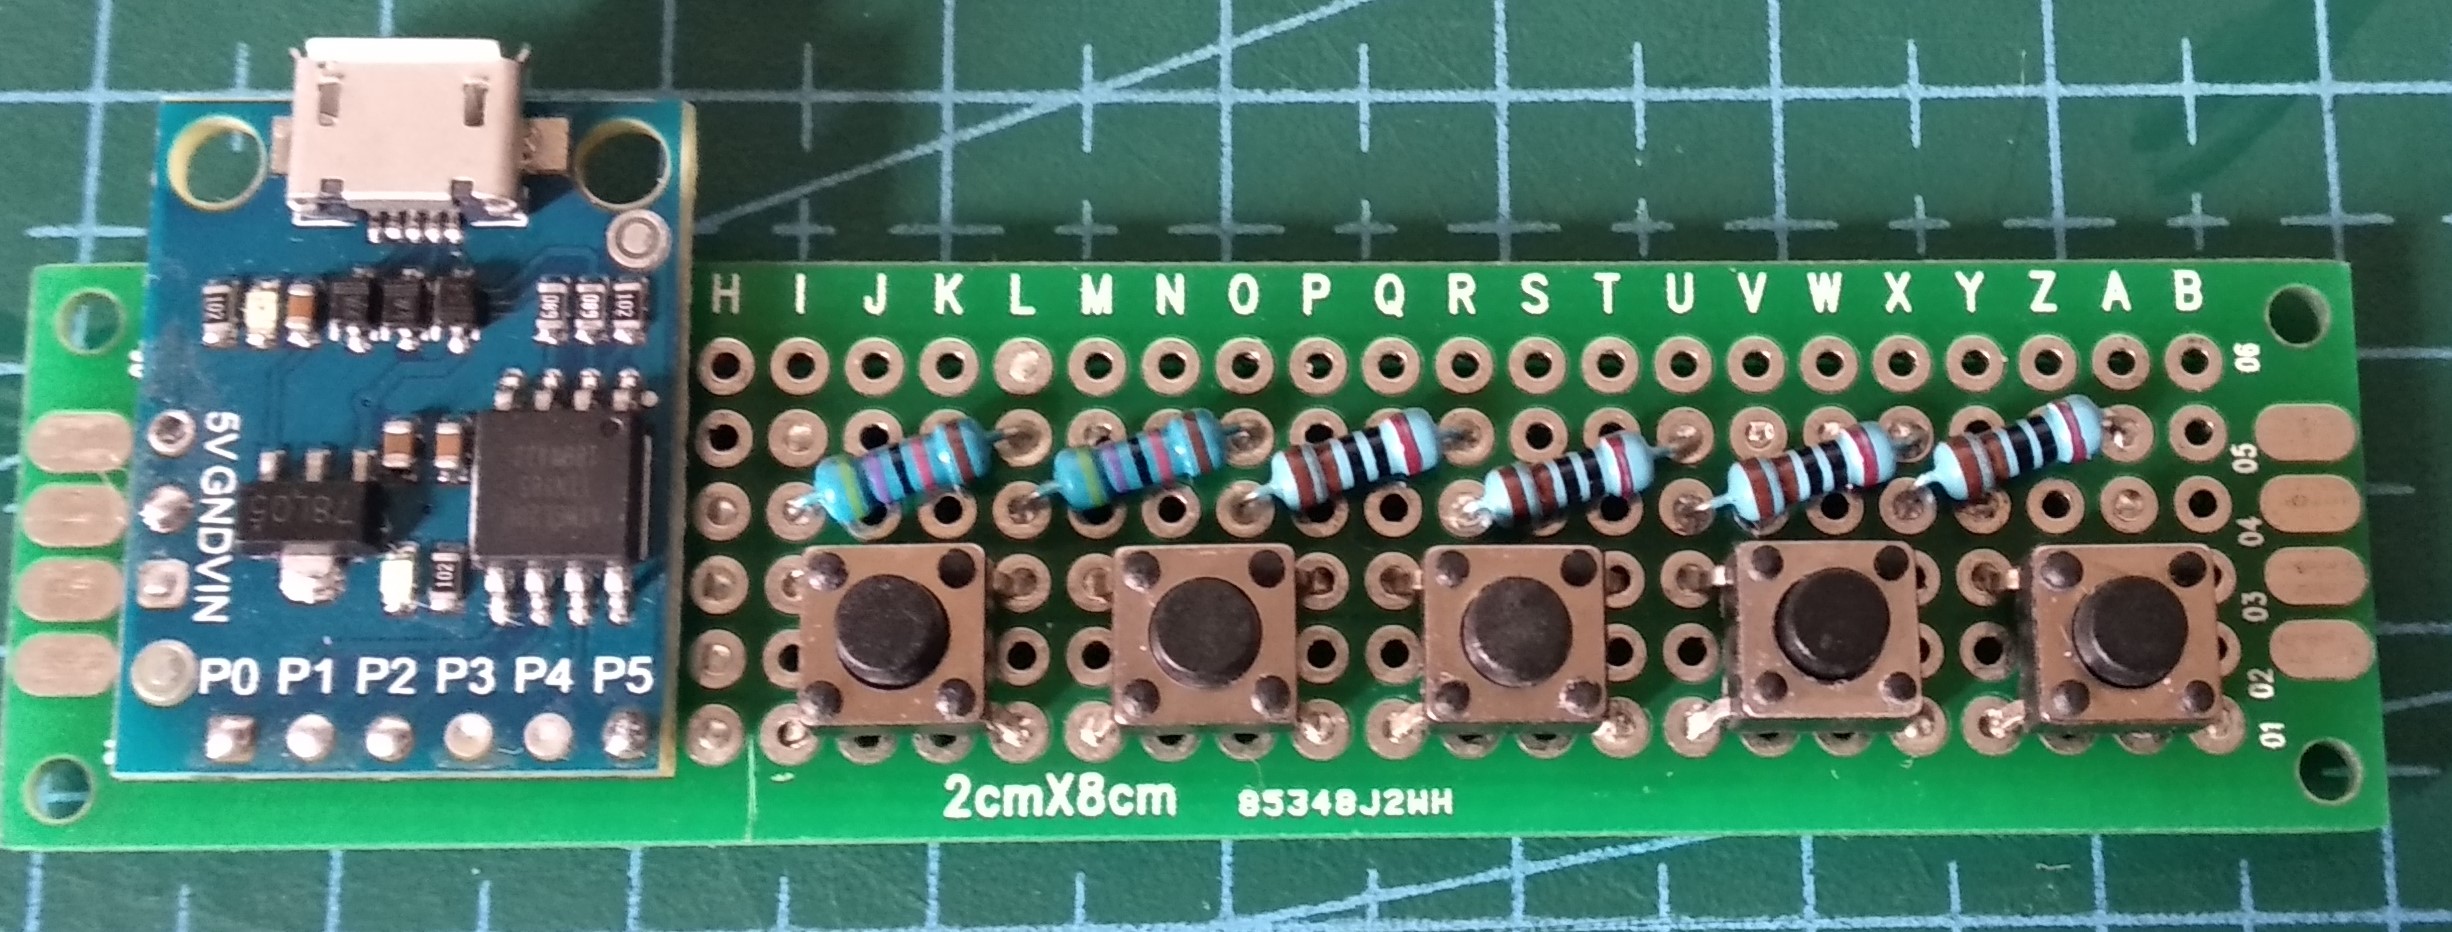
成品
IMG103157.jpg

网上有使用PyMouse,PyKeyboard,PyUserInput(前两者的整合,不活跃)的,但发现我并不适用,Pip都装不上,所以寻着PyUserInput的Readme文件找到了Pynput这个库。
这是一篇水文章。

pip install pynput

键盘

from pynput.keyboard import Key,Controller
keyboard = Controller()

#dir(Key) 功能键
#['__class__', '__doc__', '__members__', '__module__', 'alt', 'alt_l', 'alt_r', 'backspace', 'caps_lock', 'cmd', 'cmd_r', 'ctrl', 'ctrl_l', 'ctrl_r', 'delete', 'down', 'end', 'enter', 'esc', 'f1', 'f10', 'f11', 'f12', 'f13', 'f14', 'f15', 'f16', 'f17', 'f18', 'f19', 'f2', 'f20', 'f3', 'f4', 'f5', 'f6', 'f7', 'f8', 'f9', 'home', 'insert', 'left', 'media_next', 'media_play_pause', 'media_previous', 'media_volume_down', 'media_volume_mute', 'media_volume_up', 'menu', 'num_lock', 'page_down', 'page_up', 'pause', 'print_screen', 'right', 'scroll_lock', 'shift', 'shift_r', 'space', 'tab', 'up']

#按下按键
keyboard.press(Key.space)
#释放按键
keyboard.release(Key.space)
#等待按下按键
with keyboard.pressed(Key.shift):
    keyboard.press('a')
    keyboard.release('a')

鼠标

from pynput.mouse import Button,Controller
mouse = Controller()
#读取位置
print(mouse.position)
#设置一个位置
mouse.position = (1926,2020)
#相对移动
mouse.move(88,-88)
#鼠标按键
mouse.press(Button.left)
mouse.release(Button.left)
#双击
mouse.click(Button.left,2)
#滚轮(向下滚动2格)
mouse.scroll(0,2)

另有监控键盘和鼠标的官方例程,不过我用不上,所以就不复制到文章里了:

https://pynput.readthedocs.io/en/latest/mouse.html#monitoring-the-mouse
https://pynput.readthedocs.io/en/latest/keyboard.html#monitoring-the-keyboard

应用

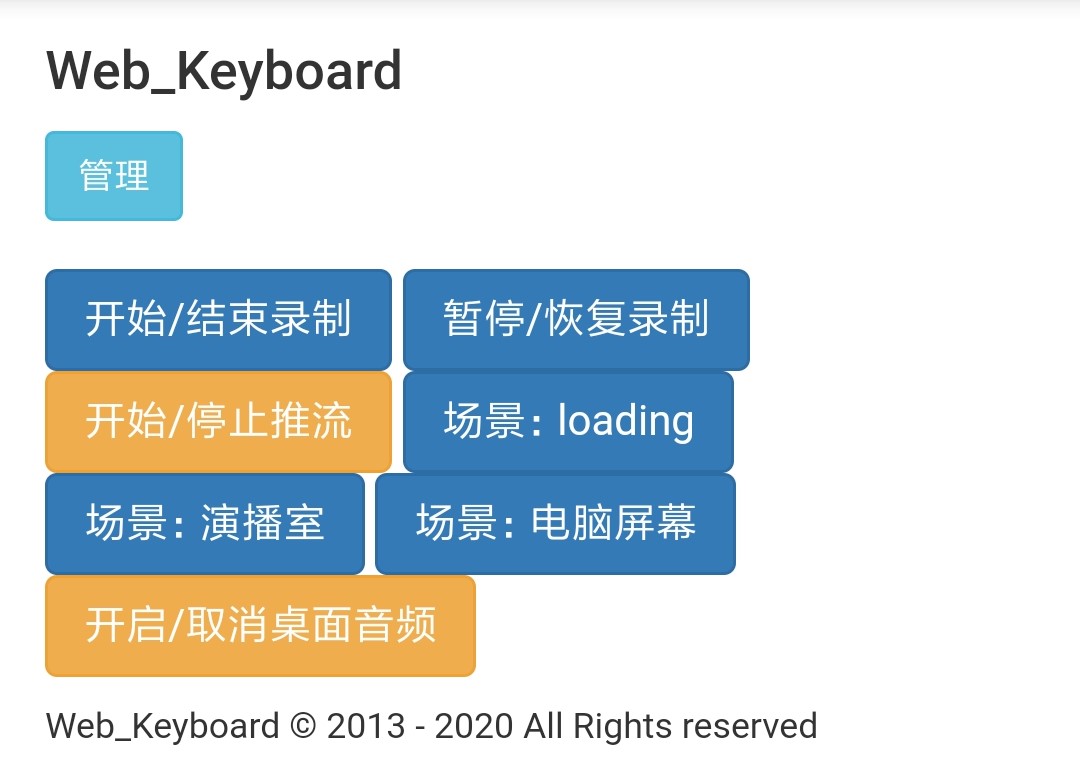
可以写一个Web宏键盘:
Screenshot_2020-07-25.jpg

安装

多数的文章都是从头编译安装的,但是自Nginx 1.9(具体不知道)后,插件可以热加载,不再需要一开始就要编译入Nginx中,使用我们可以使用包管理器来快速安装:

(Debian/Nginx) sudo apt-get install nginx-full libnginx-mod-rtmp -y

配置

打开/etc/nginx/nginx.conf的配置文件,在末尾加入:

rtmp {
    server {
        listen 1926;
        chunk_size 4096;
        application live {
            #开启直播
            live on;
            #开启HLS
            #hls on;
            #HLS视频流目录
            #hls_path /var/www/html/live;
            #每个视频片段长度
            #hls_fragment 5s;
            #播放列表长度
            #hls_playlist_length 15s;
            #连续模式
            #hls_continuous on;
            #删除多余流片段
            #hls_cleanup on;
            #嵌套模式
            #hls_nested on;
        }
    }
}

若需要HLS,则需要在HTTP配置文件中添加:

#root /var/www/html/;
#这里的路径应与上方视频流目录一致
location /live {
            types {
                    application/vnd.apple.mpegurl m3u8;
                    video/mp2t ts;
            }
            alias /var/www/html/live;
 }

推流

可以使用FFmpeg,但我这里使OBS

rtmp://<your_device_ip>:1926/live

HLS

将以下HTML保存到服务器,可通过游览器查看推流效果:

<!DOCTYPE html>
<html>
<head>
    <meta charset="utf-8" name="viewport" content="width=device-width,initial-scale=1" />
    <title>HLS Live Test</title>
    <script src="https://cdn.bootcdn.net/ajax/libs/hls.js/8.0.0-beta.3/hls.min.js"></script>
</head>
<body>
        <video id="video" controls width="100%"></video>
        <script>
            var video = document.getElementById('video');
            var hls = new Hls();
            hls.loadSource('http://<your_device_ip>/live/index.m3u8');
            hls.attachMedia(video);
            hls.on(Hls.Events.MANIFEST_PARSED,function() {
            video.play();
            });
        </script>
</body>
</html>

硬件设备信息

设备型号: HG8321R
硬件版本: 377.A
软件版本: V3R015C10S103

快速诊断

  • 使用Putty尝试Telnet连接光猫,若无法连接,请看完全流程。
  • 若连接成功,在终端(root/admin)输入如下命令:
WAP> su
SU_WAP> shell
WAP(Dopra Linux) # ?

若返回三个脚本或常用命令无法使用,则说明Shell是被阉割的,请跳到补全Shell部分。

开始

请全程将电脑连接到光猫上!

开启Telnet

确保拔掉光纤,电脑通过网线连接到光猫上!
打开压缩包中的ONT组播工具,按如下步骤操作:

  1. 点击刷新,选中连接光猫的网卡
  2. 选中维修使能,其他不变,点击启动
  3. 等到光信号灯不亮,LAN1、LAN2、网络E/G三个灯长亮,按下停止,关闭工具

之后请硬重启光猫,并连接光纤。

补全Shell

打开压缩包中的TFTPServer.exe,并打开一个Telnet连接,按如下步骤操作:

WAP> load pack by tftp svrip <your_dhcp_ip> remotefile allshell.bin

成功后输入reboot重启。

获取配置文件

打开一个Telnet连接,按如下步骤操作:

WAP> su
SU_WAP> shell
WAP(Dopra Linux) # cd /mnt/jffs2
WAP(Dopra Linux) # cp hw_ctree.xml hw_ctree2.xml
WAP(Dopra Linux) # vi aescrypt.sh && chmod +x aescrypt.sh
--------复制如下内容--------
#!/bin/sh
help()
{
cat << HELP
usage:
crypt option inputfile
options:
-d decode
-e encode
-h show this help message
This script is used to decode/encode Huawei HG8245A config file.
If the outputfile argument is not present, a "deocde"/"encode" sub name will be append                              
on the name of inputfile as outputfile.
Dai Yun 2014 02 11 Chongqing
HELP
exit 0
}
if [ -z "$1" ] ; then
help
fi
checkfile()
{
if [ -z "$1" ] ; then
echo "inputfile must be present"
exit 2
fi
if [ ! -f "$1" ] ; then
echo "inputfile:" $1 "is not exist"
exit 3
fi
}
decode()
{
checkfile $1
local inputfile=$1
if [ -n "$2" ] ; then
local outputfile=$2
else
local outputfile=${inputfile}.decode
fi
gzname=${outputfile}.gz
cp $inputfile $outputfile
aescrypt2 1 $outputfile tmp
mv $outputfile $gzname
gzip -d $gzname
exit 0
}
encode()
{
checkfile $1
local inputfile=$1
if [ -n "$2" ] ; then
outputfile=$2
else
outputfile=${inputfile}.encode
fi
gzname=${outputfile}.gz
cp $inputfile $outputfile
gzip $outputfile
aescrypt2 0 $gzname tmp
mv $gzname $outputfile
exit 0
}
case $1 in
  -h) help;;
  -d) decode $2 $3;exit 1;;
  -e) encode $2 $3;exit 1;;
  *) echo "option argument wrong";help;exit 1;;
esac
---------------------------
WAP(Dopra Linux) # ./aescrypt.sh –d hw_ctree2.xml hw_ctree_decode.xml
WAP(Dopra Linux) # tftp -p -l hw_ctree_decode.xml <your_dhcp_ip>

这样配置文件就被解密和上传到我们的电脑上了,在TFTP软件目录下可以找到,打开它,搜索如下内容:

<X_HW_WebUserInfoInstance InstanceID="1" UserName="

即可找到管理员账号与密码,我们可以登录看看。

解决 不在维护模式 的登录问题

打开上面的配置文件,找到普通用户一行,修改用户等级:

UserLevel="0"

在终端输入:

WAP(Dopra Linux) # tftp -g -r hw_ctree_decode.xml <your_dhcp_ip>
WAP(Dopra Linux) # ./aescrypt.sh –e hw_ctree_decode.xml hw_ctree.xml

重启即可。

改回原版华为界面

修改hw_boardinfo文件,替换如下:

0x0000001b 修改为 COMMON
0x00000031 修改为 CHOOSE_huawei

引用&工具下载

破解过程来自宽带猫
解密脚本来自:http://blog.sina.com.cn/s/blog_6d27791f0101cxcv.html
工具下载:HG8321R-tools.7z

GNU Privacy Guard(GnuPG或GPG)是一种加密软件,它是PGP加密软件的满足GPL的替代物。GnuPG依照由IETF订定的OpenPGP技术标准设计。GnuPG用于加密、数字签名及产生非对称钥匙对的软件。

基本用法

安装GnuPG

一般情况下,Linux系统自带GnuPG,输入gpg可以看到相关的帮助与用法:

gpg (GnuPG) 2.2.12
libgcrypt 1.8.4
Copyright (C) 2018 Free Software Foundation, Inc.
License GPLv3+: GNU GPL version 3 or later <https://gnu.org/licenses/gpl.html>
This is free software: you are free to change and redistribute it.
There is NO WARRANTY, to the extent permitted by law.
......

当然,所有的Linux源中都带有该软件包,使用默认的包管理器即可安装:

(Debian/Ubuntu) sudo apt-get install gpg -y

生成一个密钥对

在终端输入:

gpg --full-generate-key

按步骤操作:

Please select what kind of key you want:(选择一个秘钥种类,默认即可)
   (1) RSA and RSA (default)
   (2) DSA and Elgamal
   (3) DSA (sign only)
   (4) RSA (sign only)
Your selection? 1
RSA keys may be between 1024 and 4096 bits long.(输入秘钥长度,这里我选择2048)
What keysize do you want? (3072) 2048
Requested keysize is 2048 bits
Please specify how long the key should be valid.(密钥对过期时间)
         0 = key does not expire (永不过期)
      <n>  = key expires in n days (天)
      <n>w = key expires in n weeks (周)
      <n>m = key expires in n months (月)
      <n>y = key expires in n years (年)
    (比如2年2月:2y2m,这里我做演示,所以为2天)
Key is valid for? (0) 2
Key expires at Thu 16 Jul 2020 09:07:42 AM UTC
Is this correct? (y/N) y

GnuPG needs to construct a user ID to identify your key.
Real name: tester(名称)
Email address: [email protected](邮箱)
Comment: test(注释)
You selected this USER-ID:
    "tester (test) <[email protected]>"

Change (N)ame, (C)omment, (E)mail or (O)kay/(Q)uit? O
......(这里之后会要你输入保护秘钥的密码)
......(最后输出一些信息)
gpg: key 9BFDDC59D3138AA7(这是秘钥ID,可替换下文的tester来作为秘钥标识) marked as ultimately trusted
gpg: revocation certificate stored as '/root/.gnupg/openpgp-
revocs.d/4E9A37A6608115A542D30BF69BFDDC59D3138AA7.rev'
public and secret key created and signed.

pub   rsa2048 2020-07-14 [SC] [expires: 2020-07-16]
      4E9A37A6608115A542D30BF69BFDDC59D3138AA7
uid                      tester (test) <[email protected]>
sub   rsa2048 2020-07-14 [E] [expires: 2020-07-16]

分享公钥

将你的公钥分享给朋友们,以便验明正身和加密信息:

gpg -a --export tester(秘钥标识,可为邮箱,名称以及秘钥ID) > gpg_pub.key

这个文件格式为:

-----BEGIN PGP PUBLIC KEY BLOCK-----
......
-----END PGP PUBLIC KEY BLOCK-----

私钥导出

这会要你输入密码:

gpg -a --export-secret-keys tester > gpg_pri.key

生成吊销证书

生成一张吊销证书,以备不时之需让秘钥失效,这会要你输入密码:

gpg --gen-revoke test > gpg_revoke.key

按步骤操作:

Create a revocation certificate for this key? (y/N) yes(当然yes)
Please select the reason for the revocation:(选择一个理由)
  0 = No reason specified (未指定理由)
  1 = Key has been compromised (秘钥被盗用)
  2 = Key is superseded (秘钥被取代)
  3 = Key is no longer used (不再使用)
  Q = Cancel (取消)
(Probably you want to select 1 here)
Your decision? 0
Enter an optional description; end it with an empty line:(一些说明)
> test
Reason for revocation: No reason specified
(No description given)
Is this okay? (y/N) y

如果需要吊销,只需导入该证书即可。

查看&管理

查看已有公钥:

gpg --list-keys

查看已有私钥:

gpg --list-secret-keys

删除一个秘钥:

gpg --delete-key 用户标识

导入一个秘钥:

gpg --import 秘钥文件

输出秘钥指纹:

gpg --fingerprint tester
(比如:4E9A 37A6 6081 15A5 42D3  0BF6 9BFD DC59 D313 8AA7)

加密与解密文件

加密一个文件:

gpg --recipient tester --encrypt demo.txt
(这会在目录下生成一个名为demo.txt.gpg的加密过后的文件)

解密一个文件,这会要求输入密码:

gpg --recipient tester --decrypt demo.txt.gpg > output.text

给文件签名

其实这是我最主要的用法:

gpg --recipient tester --clearsign demo.txt
(这会在目录下生成一个demo.txt.asc文件,包含签名)

单独生成签名:

gpg --recipient tester --armor --detach-sign demo.txt
(这会在目录下生成一个demo.txt.asc文件,只有签名)

验证签名:

gpg --verify demo.txt.asc demo.txt
(若匹配秘钥列表中的一个,则输出如下)
gpg: Signature made Tue 14 Jul 2020 09:45:54 AM UTC
gpg:                using RSA key D7AF674BE9E2EA5C9C5EA029FB89B9B6AA70B6DD
gpg: Good signature from "tester <[email protected]>" [ultimate]

与Python

安装相关包

sudo pip3 install python-gnupg

加密&解密

#!/usr/bin/python3
import gnupg
#这指向你的用户目录下的.gnupg文件夹
gpg = gnupg.GPG(gnupghome="/root/.gnupg")
#加密字符串
text = "817"
enc_text = gpg.encrypt(text,"tester")
print("ok: ",enc_text.ok)
print("status: ",enc_text.status)
print("stderr: ",enc_text.stderr)
print(str(enc_text))
#解密字符串
dec_text = gpg.decrypt(str(enc_text),passphrase="password")
print("ok: ",dec_text.ok)
print("status: ",dec_text.status)
print("stderr: ",dec_text.stderr)
print(str(dec_text))
#加密文件&加密文件
with open("demo.txt","rb") as f:
    status = gpg.encrypt_file(f,recipients="tester",output="demo.txt.gpg")
print("ok: ",status.ok)
print("status: ",status.status)
print("stderr: ",status.stderr)
with open("demo.txt","rb") as f:
    status = gpg.decrypt_file(f,passphrase="password",output="demo.txt")
print("ok: ",status.ok)
print("status: ",status.status)
print("stderr: ",status.stderr)

文档

https://docs.red-dove.com/python-gnupg/

相聚有时 后会无期

编辑部全体成员告读者书

  • 亲爱的读者们:
  • 感谢各位读者的订阅!
  • 不知不觉,本报已与大家走过236天的时光,自本报创建以来,我们一直秉着用心做新闻的理念,收获了广大读者的喜好,在此,编辑部全体成员向您表示衷心的感谢。
  • 相聚有时,后会无期,我们因为偶然的相遇成为了朋友,而如今却要分离开来,不知何年何月再次相聚,在这短短的时光里,作为朋 友,我们相互倾诉,我们相互聆听,我们共同分享喜悦,因为有你,我们克服千难万苦,奔波在新闻的一线,因为有你,我们穿过时间空间,记载着历史的行程,因为有你,我们度过了一段有意义的时光,与你的相遇,是我们所遇到最幸运的事。相见时易,离别时难,我们之间深厚的感情,突然被刀割断,引起了我们深深的疼痛,我们之间的感情早已融入到双方的血脉之中,虽被割断,虽有巨痛,虽有不舍。
  • 我们迫不得已休刊,这一休,不知何年再重启,相聚有时,后会无期,我们偶然相遇在一家报刊亭中,你从众多的报刊中选中了我们 ,因此我们结下了深厚的感情,谁能想到,一张薄薄的纸张,能将我们紧紧相连,成为朋友知己,与我们畅谈古今大事,与我们辨析世界的局势,与我们探索事件的真相,你不仅是我们的读者,还是历史的谱写着,而我们亦是你的聆听者,聆听者你的诉说。一张薄薄的纸张,不仅仅印刷着文字,还承载着你我之间深深的感情,分时易,别时难,肉体虽早已离去,而感情仍藕断丝连,希望若干年后,你还记得我们之间共同欢笑过,我们之间共同给予过前进的动力。
  • 休刊不是一切的终点,而是一切的起点,我们希望我们共同陪伴的日子里,我们已经给了你足够的向前的加速度,让你不断的加速向 前奔跑,带着我们的希望,奔向广阔的未来,奔向黎明的方向,享受着日光沐浴全身的温暖,享受着傍晚凉风拂过全身的凉爽。我们希望在你的人生中已经留下了简短的一笔,而正因这简短的一笔,给了你巨大的影响,给了你前进的动力,希望若干年后,这留下的简短的一笔,能够成为你一生受用的宝贵的财富。
  • 相聚有时,后会无期,感谢你长久以来的订阅,希望我们在未来能够再次相遇时,仍然还记得对方的模样!
2020年7月6日 星期一
学习日报编辑部全体人员